Artificial Turf Installation Guide
1. Planning
Initial Considerations
A. Area: Define and clearly mark the designated area for turf installation to ensure precision from the start.
B. Drainage: Assess the current drainage system in the project area. If inadequate, consider implementing additional drains or modifying existing ones through grading or sloping to enhance water flow.
C. Soil Condition: Examine the soil to determine if moistening or softening is necessary, or if large rocks need removal with a jackhammer. If the soil is rain-soaked, allow it to dry for several days before beginning the synthetic turf installation.
D. Irrigation: Identify and locate any existing irrigation components such as sprinklers or bubblers that serve remaining vegetation. Ensure all underground utilities, like irrigation lines and electrical conduits, are mapped to avoid damage during installation. For areas where lawn turf is used, consulting with an irrigation specialist to reroute or deactivate unnecessary heads is advisable. If using Turf Chiller infill technology, adjust the irrigation settings accordingly to provide an easy watering source which can enhance the cooling feature.
E. Preventing Future Damage: Evaluate the need for protective measures against rodents or other ground pests. Installing rodent wire, similar to chicken wire, might be necessary to secure the perimeter and protect the turf from being disturbed by pets or wildlife.
F. Existing Design Elements: Locate any concrete borders and determine if nailing into concrete footings is required. Install any curbing, edging, or border materials before laying the synthetic turf to achieve precise measurements. Considerations for tree roots and pest control should also be made at this stage.
G. Measurements: Minimize labor by measuring the project area meticulously. Design the layout to reduce the number of seams in the synthetic lawn, planning for an extra 5-10% of material to accommodate any design features such as curves. Use a smart level or transit to ensure a minimum slope of 2% for proper drainage.
H. Design Application Tips: Recognize that all synthetic turf products have a pile direction, which must be consistent across all sections to avoid visible seams and to minimize sheen. The grain should ideally face toward the primary viewpoint for the most aesthetically pleasing effect.
Material Prep
A. Turf: Measure the total area designated for turf and order an ample supply to cover it all, even if installations are phased over time. Due to normal variations between batches, purchasing enough turf from the same batch is crucial for consistency. Turf generally comes in 12 or 15-foot wide rolls. Divide your installation area into 12 or 15-foot wide sections, calculate the total length required, and order accordingly. Unroll the turf a day prior to installation to allow it to relax and flatten, especially if it shows any signs of wrinkling.
B. Base Material: You will need between two to six inches of stone base beneath your turf. Typically, one yard of base material covers 80 square feet at a depth of 4 inches (one yard equals one ton). Use a fine stone or aggregate (89 stone; 1/4” to 5/8” in size) atop a coarse aggregate (57 stone; 1/2” to 3/4” in size), or a blend of both for optimal stability. Your local building supply can provide these materials and may offer delivery and installation services. Avoid using pea gravel; its rounded stones are difficult to compact and can shift excessively.
C. Infill: Infill is crucial for adding weight to the turf, supporting fiber stability, and enhancing drainage. It provides a firm, natural feel underfoot. For areas with HydroChill™, at least 2 pounds per square foot is necessary. Envirofill™, a green-colored infill with cooling properties and Microban™, is also recommended, particularly in areas frequented by children and pets.
D. Sand Infill: In certain regions, consider using color-coated sand as a top layer over your basic infill. This type of sand, while costlier than uncoated options, should be applied at about 1 pound per square foot. Pre-estimate three to five pounds of sand per square foot for heavier turf grades (50-80 ounce).
E. HydroChill™: HydroChill™ is an advanced evaporative cooling technology designed to lower temperatures on synthetic turf surfaces. This pre-coated sand infill arrives ready for installation; simply hydrate to activate its cooling properties. HydroChill™ is highly recommended for its significant temperature reduction and added comfort on hot days, especially in areas used by families and pets.
F. Fabrics: While weed barriers may be optional, consider their necessity on a project-by-project basis. A wire mesh rodent barrier might be required if there is a history of rodent issues (like gophers or moles).
G. Seaming Material: Ensure ample seaming tape and adhesive are on hand to properly secure seams, which are among the most visually discernible aspects of the installation. Adhere to all adhesive usage and storage guidelines as specified on their labels. Strategically plan your project to minimize visible seams, positioning them out of direct line of sight when possible, and consider layouts that maintain 15-foot widths to reduce labor and seam visibility.
H. Landscape Nails/Spikes: Choose from a range of spike types—plastic to galvanized/non-galvanized—based on local soil conditions. Spikes are used near sidewalks, tree rings, and other features, and should be deeply embedded to be eventually concealed by infill. Apply nails every six inches along the turf's perimeter and at all seams to ensure secure placement. Use nails ranging from 3.5 to 10 inches, with closer spacing where necessary.
I. Edging Material: Polyboard offers superior performance over traditional lawn edging products due to its durability and versatility. It mimics the appearance of wood but behaves like plastic, and can be molded to fit various landscape designs. Pressure-treated wood is also an option for edging.
TOOLS & EQUIPMENT
Be sure to check out our Material List for Recommended Products
A. Safety:
- Rubberized and leather gloves for hand protection.
- Back braces to support back during heavy lifting.
- Knee guards for knee protection during installation.
- Safety glasses to protect eyes from particles and debris.
- First-aid kit ready for any minor injuries.
- Safety cones to secure areas around street-side installations.
B. Measuring:
- 100 ft. flexible metal tape measure for long-range measurements.
- Snap line for precise turf marking.
- Hard-edge level, two-to-four foot, to ensure level installation surfaces.
- Square or T-square to accurately square the edges of the turf.
C. Site Preparation:
- Construction-grade wheelbarrows for material transport.
- Flat head shovels for moving and smoothing materials.
- Rounded head spades for effective digging.
- Large and small picks for breaking up compacted soil.
- Leaf rake for cleaning and leveling the site.
D. Base Preparation:
- Transit or smart level for precise contouring.
- Asphalt or landscape rake (40 inch) for spreading base materials.
- Pointed mason trowels for detailing edges.
- Hand tampers (eight or ten inch) for compacting small areas.
- Water-filled roller and small wooden pieces (2” x 1” x 2’) for hand tamping edges.
E. Turf Cutting:
- Commercial quality knives and blades, ensuring readily available replacements.
F. Infilling:
- Drop spreaders for distributing infill uniformly, available in sizes suitable for small to large jobs.
- Installation and grooming rakes, as well as grooming hand brooms or tools, all made of poly-nylon for durability.
G. Material Handling (> 1000 SF):
- Forklift with a 15-foot carpet pole for moving large rolls.
- Bungee cords or ropes for securing loads.
- Carpet dollies to facilitate easy movement of heavy materials.
H. Hand Tools:
- Small hand shovels, hammers, and pliers of various sizes and shapes for detailed work.
- Wrench and socket set for equipment adjustments and minor repairs.
- Sledge hammers and rubber mallets for driving stakes and smoothing surfaces.
- Cement chisels and pipe cutters for alterations to hard materials and irrigation systems.
I. Power Tools:
- Power brushes for fluffing turf blades.
- Hand saws or power saws for cutting bender boards and pipes.
- Leaf blowers for site cleanup.
- Optional rental tools like sod cutters and vibratory plate compactors for specialized tasks.
J. Misc. Tools:
- Tarps and plastic drop cloths for protecting the work area.
- Containers for disposal of used blades and buckets for easy access to materials and tools.
- Gas cans for fuel and fuel mixes.
K. Site Clean Up:
- Water hose (100 ft.) with variable nozzle heads.
- Brooms (soft and hard bristle) and small hand brooms for detailed cleaning.
- Shop vacuum, ranging from two gallons upwards, for thorough cleanup.
2. Area Preparation
Call 811 Before beginning any digging, it's essential to dial 8-1-1. This universal number connects you to regional services that coordinate the location of underground public utilities in the U.S., helping prevent damage and service interruptions.
A. Clear the Area: Remove all existing turf, sod, mulch, etc., from the marked area. This can be done using a manual shovel or a gas-powered sod cutter, which is available for rent at most equipment rental centers. Alternatively, consider hiring a local landscaper to remove the sod and clear any unwanted landscaping. If replacing an old lawn, excavate two-to-six inches of turf and soil, which you'll later replace with a stone base material.
B. Landscaping Considerations: When planning around trees, shrubbery, flowers, light poles, and utilities, make sure to mark these areas clearly to adjust the turf layout accordingly.
C. Protect Tree Roots: Ensure that the areas around the bases of trees are left uncovered to avoid damaging the roots.
D. Waste Disposal: Check local ordinances regarding the disposal of green waste before starting your project. Allow the site to dry out for a few days after marking and before beginning excavation.
E. Avoid Tilling: Do not use a tiller to remove turf as it disturbs the soil underneath, creating an unstable base. For larger areas, a sod cutter is recommended. For smaller areas, a spade or shovel can be used to cut the turf into manageable strips.
F. Remove Organic Material: Ensure that any areas from which tree stumps or roots have been removed are free of organic material. These areas should be filled and compacted before starting the installation to prevent subsurface failures.
G. Marking the Area: Use an inverted spray can marker to delineate the boundaries of your lawn and to outline the layout. Keep in mind that US made premium synthetic turf typically comes 15-foot widths with Import material generally 12-foot wide or less, so plan your installation to minimize seams.
H. Choose the Right Edging: Various edging materials and border solutions can be used to enhance your synthetic turf project. Options include transitions from synthetic turf to flower beds, mulch, stone edging, or sidewalks. Synthetic lumber or specific turf edging are also viable choices.
I. Install Enhancements: This is the ideal time to add enhancements such as edges, large rocks, pavers, stepping stones, walkways, and walls.
J. Manage Irrigation: If there is a sprinkler system within the installation area, consider rerouting it to the perimeter, capping off unneeded sprinklers, and turning off their valves to prevent interference with the turf.
3. Soil Compaction
A. Soil Compaction: Compacting the native soil/sub-grade prior to constructing the base may be necessary to ensure a stable foundation.
B. Geotextile Installation: If the native soils are soft and/or saturated, it is advisable to install a geotextile layer. This separates the soft soils from the crushed stone base, providing stability and preventing mixing.
C. Water Presence: As a general guideline, use a geotextile if there is standing water or if water surfaces underfoot, indicating overly moist conditions.
D. Ground Firming: Firm up the ground that will serve as your turf's foundation. Utilize a sod roller or a vibrating plate compactor, available from local rental suppliers, to ensure the ground is properly compacted. Also, make sure the ground is appropriately sloped or graded for adequate drainage.
E. Weed and Pest Control: Apply a high-quality weed and turf killer to the lawn installation area to prevent growth under the new turf.
F. Additional Protective Measures: Assess if extra measures are needed to protect against weeds, rodents, or other ground animals. In certain environments, especially arid or dry ones, installing a weed barrier or rodent wire (similar to chicken wire) may be beneficial but isn't always necessary.
4. Base Construction
A. Material Spread: Apply a crushed stone base of two-to-six inches evenly over the prepared area.
B. Equipment Use: If using heavy equipment for spreading, avoid driving directly on the prepared site. If unavoidable, operate cautiously to prevent damaging the base during turns.
C. Aggregate Specification: The crushed stone should be D.O.T. Class 2 aggregate or an approved equivalent, with a maximum particle size of 3/4 inch. This type of aggregate is commonly available in most areas. Most gravel pits in your area may carry a blended stone product they recommend for artificial turf projects
D. Smooth Application: Spread the crushed stone as evenly and smoothly as possible. Utilizing a finer material can facilitate achieving the final grade.
E. Climate Considerations: In arid climates like Las Vegas, Phoenix, or San Diego, a two-inch base course is typically sufficient. Conversely, in areas with higher rainfall or water tables, such as Seattle, New Orleans, or Houston, a base up to six inches may be necessary.
F. Compaction Process: Lightly moisten the surface with water and firmly compact the sub-base using a hand compactor, landscape roller, or vibratory plate compactor.
G. Leveling Irregularities: Should there be surface depressions or undulations, apply a thin layer of fines (stone dust, screenings, or manufactured sand) to level. This layer should not exceed two inches and must be compacted with a heavy roller or plate compactor to fill any depressions deeper than 1/4 inch.
H. Drainage Slope: Although synthetic turf drains vertically through built-in holes, we recommend giving the base a slight slope away from any structures to a proper drainage area, ensuring no water pooling.
J. Final Compaction: Make multiple passes over the project area until achieving a compaction rate of 95% or more. The area should be dry, smooth, and firm to eliminate bumps under the synthetic turf.
K. Methodical Spreading: Begin adding your base material from the farthest side of the installation area, moving from edge to edge— not center to edge. Spread the base material evenly, grading and leveling according to design and drainage requirements, and shaping as desired, whether flat, slightly rolled, or mounded.
L. Compaction Equipment: For larger jobs, a gas-powered vibratory plate compactor can be rented. Ensure overlaps during passes to minimize ridges and bumps.
M. Avoiding Disruption: Do not walk on the freshly laid base until it has been compacted. Walking on loose base can create holes and uneven spots. An easy way to test for sufficient compaction is to step onto the stone base; if a footprint is left, further compaction is needed.
5. Lay Turf
A. Roll the synthetic turf out on top of the constructed based, as planned. If the site requires multiple roll widths, be sure to have the lay of the fibers on each roll of turf running in the same direction.
B. When seaming is required, trim the selvedge (un-tufted edge) off turf and lay in the desired position.
C. When trimming selvedge, begin cutting two tuft rows in from edge in order to achieve proper seam strength.
D. Lay the next roll adjacent to the first and repeat Step C. Then butt the seams together.
E. With a carpet or utility knife, trim the overlapped turf to match the trimmed edge of the first roll if necessary.
F. Make all cuts as close as possible without touching. Seam spacing should be no more than 1/8 inch.
G. Repeat as needed for as many roll widths as the job requires.
H. Around the borders, trim the turf to match the edges.
I. If a secured or fastened edge is desired, do not secure the edge until most of the infill is installed (Refer to Step 8). More on this later.
J. When cutting curved edges, cut in small relief cut increments to match the design.
K. Rough-cut the perimeter before any seaming.
L. Always stretch synthetic turf tight to reduce wrinkling.
6. Seaming
A. Fold the adjacent trimmed edges of two rolls of turf approximately two feet apart the entire length of the seam.
B. Mark the centerline of the seam on the exposed base or seaming tape with a chalk line or spray paint.
C. Roll out seam tape centered over the entire length of the seam line. Apply adhesive covering all of the seam tape from one end to the other. Depending on the type of adhesive used, you may need to allow time for vapors/gases to escape (flashing). Refer to the adhesive manufacturer’s directions. The flashing time required may be dependent on ambient temperature and humidity.
D. After adhesive has flashed, lay the edges of each roll of turf directly onto the adhesive/tape, making sure not to bury any turf fibers into the adhesive.
E. Add weight (i.e. sandbags) down the length of the freshly laid seam, or use a heavy roller along the seam length once the adhesive has tacked up. The adhesive drying/curing time will vary with different adhesives dependent upon climatic conditions.
F. After the adhesive has dried, trim off your turf so your lawn fits exactly as you want.
7. Secure Edges
The edges can be secured in a number of ways:
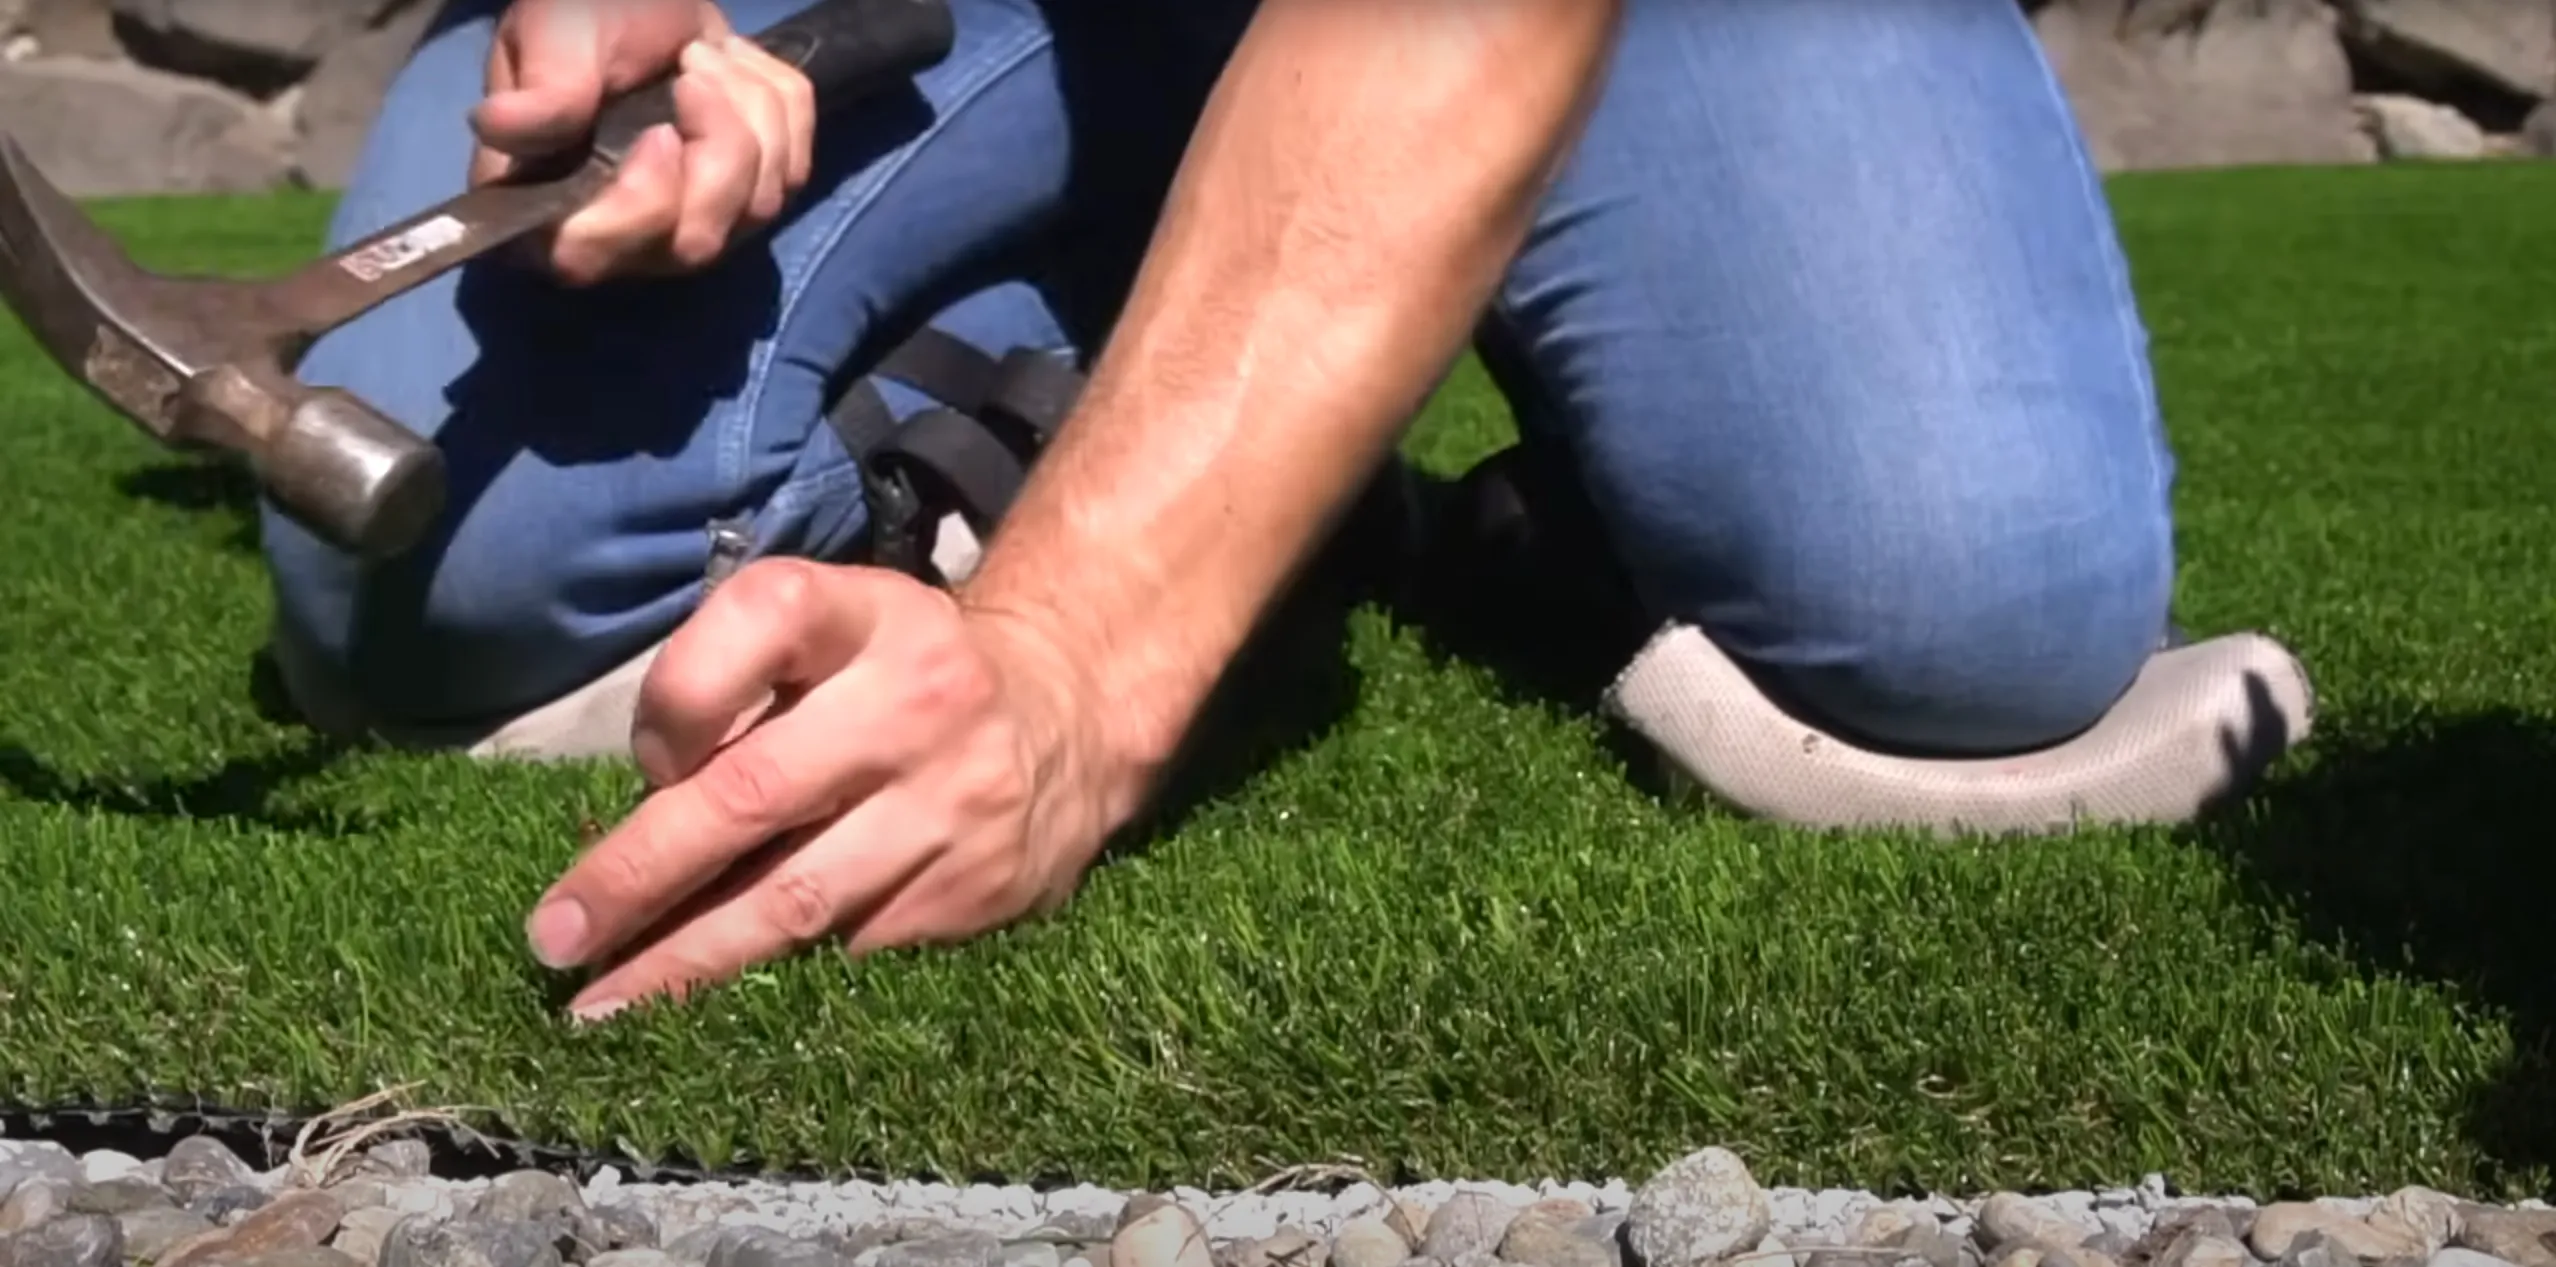
A. Landscape Nails and Spikes: Hammer landscape spikes, timber spikes, sod staples, etc., into the edge around the perimeter of the turf spaced every 4”-8”. This is particularly important if you are not planning on using an edging or curbing. Ensure the nail heads are level with the turf backing to prevent dimpling. Additional trimming of the turf may be necessary afterward.
B. Nailer Board: When installed next to a concrete or asphalt curb, a nailer board or synthetic lumber can be installed (preferably in Step 2, Area Preparation) by nailing the board to the curb with concrete nails. The turf can then be nailed into the top of the installed nailer board with a landscape nail. More edge trimming of the turf may be necessary afterward.
C. Buried Edges: Excavate a narrow trench around the border, deep enough to bury the exposed edge of the turf. Tuck the turf’s edge into the trench (additional trimming of excess turf may be necessary). Nail and backfill the excavated soil against the buried turf, and compact. The edge can then be hidden with mulch, straw, rock, etc.
D. Edging Options: Depending on your yard and landscape concepts, you might install edging around your new lawn. Options are incredibly varied and include extruded curbing, 4” x 4” timbers, natural stone, rock, metal edging, and plastic edging. If you are not going to apply an edging, it is suggested to hammer landscaping nails every 4” to 8” along the perimeter of your synthetic lawn to prevent the edges from lifting.
8. Infill Installation
A. Brush Blades: Prior to applying the infill, stand the turf up vertically using a power broom or a stiff bristle broom. Avoid using steel or wire bristle brooms that can damage the fibers. This will keep all the turf fibers erect and exposed, which is crucial for proper infill application.
B. Infill Spreading: Use a drop spreader, typically used for spreading turf seed, fertilizer, or lime, to spread the infill. Apply the infill in lifts ranging from 1/4" to no greater than 1/2" at each pass.
C. Grooming: Apply infill evenly across the turf and groom it thoroughly to ensure a consistent level of infill throughout the area.
D. Edging: If the borders or edges of the turf will be secured, postpone the infill application in these areas until last (refer to step 7).
E. Infill Application Technique: Avoid dumping large quantities of infill directly on the turf as it can trap fibers and necessitate excessive grooming. Instead, evenly distribute the infill across the surface of your new lawn, then use a stiff bristle push broom or power broom to deeply sweep the infill into the fibers. Repeat the spreading and brooming process until the infill is uniformly distributed and no less than 1/2" – 3/4" of the turf fiber tips are exposed.
F. CAUTION: Exposing too much fiber (insufficient infill) can cause the fibers to mat or crush under heavy foot traffic, leading to premature wear and potentially voiding the manufacturer's warranty.
G. Infill Types: Multiple types of infill may be used on the same installation site. Often, a combination of silica sand and granulated rubber, or silica sand with a manufactured sand topdressing, is applied in layers. Start with the silica sand, followed by the granulated rubber or topdressing.
H. Adhering to Specifications: Follow the specific site guidelines regarding the amount or depth of each type of infill material used.
I. Infill Quantities: For turf products ranging from 50 to 80 ounces, typically four pounds per square foot of infill will be used. Heavier turf products might require up to five pounds per square foot. The exact amount of infill varies depending on the product weight and the desired exposure of the synthetic blades. Once complete, 1/2” to 3/4” of the synthetic blades should be visible. Consider using color-coated sand as the final infill layer to best integrate with the local geography, applying approximately one pound per square foot.
Benefits of Infill
- Supports Turf Stability: Infill helps to anchor the base of the turf fibers, keeping them upright and stable creating ballast. This prevents the turf from shifting and enhances its overall durability.
- Enhances Appearance: By keeping the blades of grass standing upright, infill helps maintain the lush, green appearance of the turf over time, making it look more natural and well-maintained.
- Improves Drainage: Infill facilitates proper drainage, allowing water to flow through the turf more efficiently. This prevents water pooling and helps maintain a dry surface even after heavy rain.
- Increases Durability: Infill helps protect the backing material from UV rays and mechanical wear, extending the life of the turf. Just like how grass grows up through soil, infill acts the same way ensuring the blade bends a bit higher up from where it meets the backing - its weakest point.
- Adds Weight: Turf only weighs in most instances 1/2 lbs. per square foot. So adding 1-2 lbs. psf of infill at minimum adds 200%-400% more weight to the entire system. This decreases bubbles, ripples, waves over time.
- Shock Absorption: Infill acts as a cushion that absorbs impact, providing a safer surface for activities like playing, walking, or sports, reducing the risk of injuries. Most fields use rubber infill or a mixture with sand.
- Heat Reduction: Certain types of infill, like HydroChill, can significantly reduce the surface temperature of synthetic turf by holding moisture that cools the surface as it evaporates during warmer weather.
- Weed Prevention: Infill helps to block sunlight from reaching the base of the turf, which can prevent weeds from taking root and growing through the turf.
- Enhances Foot Stability: The firmness provided by properly installed infill offers better footing for walking or running, improving the functional use of the turf in residential and commercial settings.
- Minimizes Odors: Some infills are designed to minimize odors by trapping and neutralizing smells from pets and other sources, making the turf more pleasant for outdoor activities.
Artificial Turf Maintenance Guidelines
Maintaining your artificial turf regularly ensures prolonged beauty and functionality. While this grass lessens your gardening chores, it's not entirely maintenance-free. Here are essential tips to keep your artificial turf in top condition:
Routine Cleaning:
- Regularly clear off debris to prevent buildup and ensure a pristine appearance.
- Avoid the use of vehicles and refrain from placing heavy loads on the turf.
Prompt Repairs:
- Address any minor damage immediately to prevent further deterioration.
Recommended Cleaning Agents:
- Enzyme Cleaners: Options like SCOE 10X, Odormute, and Odoban are effective. Always adhere to the manufacturer's application guidelines.
- Vinegar: A solution of 5% white distilled vinegar can be used to flush through the turf.
- Eco-friendly Cleaners: Products such as Shaw R2X and Turf Renu are advisable as they are gentle and effective without causing suds.
- Degreasers and Mineral Spirits: Suitable for removing tougher stains like paint. Ensure thorough rinsing to avoid long-term issues.
- Mild Detergent: A diluted solution (one teaspoon per gallon of water) works well for spot cleaning.
- Bleach: To combat moss and algae, use a diluted bleach solution (one part bleach to ten parts water), ensuring complete rinsing afterward.
- Ammonia: For persistent residues, a 3% ammonia solution can be an alternative to detergents.
Stain Management:
- Artificial turf is highly stain-resistant. Most marks are not stains but residues, which should be cleaned promptly:
- Remove solid deposits with a dull knife.
- Scrub the area using soap and water with a stiff brush.
- Rinse thoroughly to eliminate soap residue.
Ongoing Care Needs:
- Use a leaf blower to remove leaves and debris regularly to prevent moisture entrapment.
- For areas susceptible to moss or algae, apply a bleach solution periodically.
- High traffic zones may require more frequent grooming and possibly professional maintenance.
- Power washing may be necessary for heavily soiled areas.
Pet Maintenance:
- Promptly remove pet waste and irrigate the area to avoid spreading. In dry conditions, it’s acceptable to let solid waste dry before disposal.
- Regularly sanitize and deodorize the area, especially in spaces frequented by pets, to maintain hygiene and odor control.
- Wash down liquid waste with water as the turf’s backing is designed to absorb and drain.